This is an old revision of the document!
—-
3. First tour into the real WME realm
So we now about the tools and we learned the basics of scripting and it’s the time to see how this knowledge applies to the game development. Before we start this tour let’s first make a brief overview of the file types you’ll be using in wme (and I strongly recommend using this naming convention):
*.script – are the files which contains the actual program
*.inc – are the include files which you can include in the script files. Their purpose is to save you hundreds of lines of the code, which would otherwise repeat in more files. Prime example of this is the file data\scripts\base.inc. You’ll be including this file in almost every script.
*.scene – is the file which contains the definition of the scene as set in the Scene Editor. Although you could define this file by hand, it’s way more comfortable to use scene edit to do the dirty work.
*.sprite – product of the sprite editor
*.actor – is the file which defines actor and his animations.
*.entity – is the file which stores the sprite entity definition.
*.font – is the font definition file. It’s an interface between the actual font and a WME. Currently there are two types of font supported – bitmap and true type.
*.window – is a definition file for GUI window elements.
*.image – is a special container to store an image (with the ability of tiling etc.). This is useful for gui elements.
*.button – is a container for button definitions.
Also WME has preset a couple of special files which you can also change, but those are defaults:
default.game and startup.settings are files created by Project Manager and stored in the first (main) game package.
string.tab located at the same place contains the localization table for the texts.
items.items contains the definition of inventory items used in the game (data\items)
responses.def is the file which defines how the dialogue window would look like.
inventory.def is the file which defines how the inventory box looks like (data\interface)
But enough of that and let’s start with the most simple thing – the scene tweaking. If we explore the contents of any of created scenes in the explorer, we’ll see that there is always a scene file and a folder scr which contains the file scene_init.script
Wme reads the scene file for the current scene, prepares all nodes as defined in the scene file, attach all scripts which are present in the scene file and run the file called scene_init.script. This is the file which we’ll examine now and I’ll add my comments to it:
#include "scripts\base.inc"

// here comes the stuff which initializes the scene
actor.SkipTo(733, 562); 		// We position actor to a certain position
actor.Direction = DI_DOWN;	// we set the direction she faces
actor.Active = true;			// we make it visible for the scene

////////////////////////////////////////////////////////////////////////////////
// scene state
global Statewarehouse; 	// We create a global variable which has the same name as
// the scene prepended by State

// default values
if(Statewarehouse==null)  	//We run the game for the very first time so the value was
{				// not  initialized yet
  Statewarehouse.Visited = false;  //We’ve never been in the scene yet
}

////////////////////////////////////////////////////////////////////////////////
// setup scene according to state variables
////////////////////////////////////////////////////////////////////////////////
if(!Statewarehouse.Visited) //If we’ve never been in the scene
{
  Statewarehouse.Visited = true; //Set that we’ve been there

  // this is our first visit in this scene...
}
Now this may look to you as an overkill script for something as similar as checking if we were in some scene or not but trust me, there’s more to it than meets the eye. This is actually very clever script which counts with many different possibilities. It counts with the game which was newly started, it counts with a scene revisiting, it counts with the fact that you can have on enter special events. Remember those cinematic moments when you played an adventure, walked in some room only to see the bridge collapsing? You wouldn’t want to see it collapse every time you visit that scene. Once is enough for sure.
So now when we uncovered what’s going on in this script, it’s actually very simple. As there are thousands of different methods, I’ve decided to choose the non violent way how to present them when needed.
Let’s look at one example from the beginning of the script.
actor.SkipTo(733, 562);
We know that objects have their methods which are identified by .name(); notation. So plain and simple we’re calling method SkipTo() of our actor object. “actor” is a global variable which contains an actor object and is declared in different script. Now someone stands up and shouts at me: “You liar, you told us, that every global variable must be declared explicitly in the script by a keyword global.” Ha, I would reply, but it’s of course true. It’s there, but neatly hidden in the included file base.inc See the power of includes? You don’t have to declare an actor, whom you would use for almost every script. You simply put it in the include file and that’s it. Template does the rest.
So let’s get back to our actor object and look at the very first methods we saw + add two more very useful methods:
Actor object methods and attributes
actor.SkipTo(x,y); - places an actor to a specified screen position. Always double check, that this position is inside of a region.
actor.Direction = ?; - is an attribute which sets the direction actor is looking. We have 8 constants (DI_UP, DI_DOWN, DI_LEFT, DI_RIGHT, DI_UPRIGHT, DI_UPLEFT, DI_DOWNRIGHT, DI_DOWNLEFT)
actor.Active = true / false; - is an attribute common to all nodes and actors which makes them active or inactive (visible or invisible).
actor.GoTo(x,y); - instead of direct placing of the actor, actor walks to specified coordinates
actor.Talk(string); - actor says a text line.
So I bet you’re eager to try the new methods in action. Let’s work on our scene_init.script then! Open the scene_init.script file located in data→scenes→warehouse→scr folder. Note that from now on, when I’ll refer to the scene_init.script you’ll find it easily without my assistance. Locate the line actor.Active = true; and add some more lines behind this one so you’ll get the following result:
actor.Active = true;
actor.GoTo(365,561);
actor.Direction = DI_DOWN;
actor.Talk("What a beautiful warehouse!");
Save your script and run the game from the Project Manager. Before we go on, let’s speak about one of the most important aspects of the game programming in WME. WME produces a file called wme.log which is placed in the project root directory. This is a critical file where all problems / script errors etc. are stored. So if you for example make a typo in the script, the game just simply states Script compiler error, but this file tells you what file and on which line contains this error. So learn to open it often or your work will be very slow.
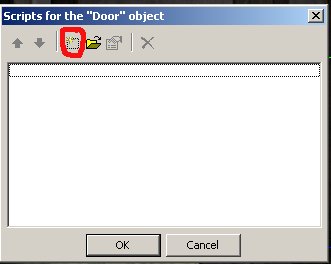
Oh-key. Let’s move on and try some interaction with the Scene. Open the warehouse scene in the scene edit again and select the door region entity we’ve created earlier. Click on the scripts button. And here click on “New script” button.
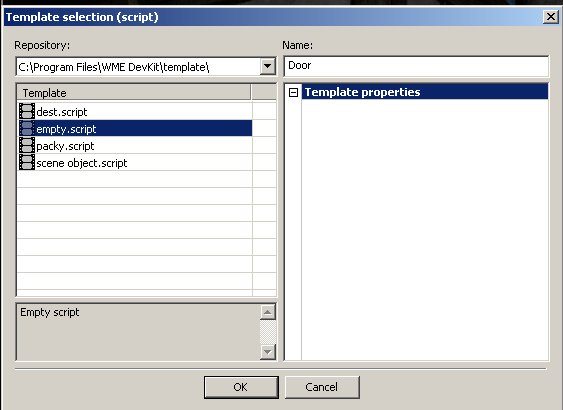
In the next dialogue select template “empty.script” on the left side and press ok.
This operation will create an empty file called door.script and place it in the scr folder. It also attaches the file to the entity so from now on you’re able to catch interaction with our door. Press OK again and save your scene. Now open the newly created file which contains the following:
#include "scripts\base.inc"

////////////////////////////////////////////////////////////////////////////////
//on "event"
//{
//  ...
//}
As you can see it’s not very useful. It has include of our old friend base.inc but apart from that it doesn’t do anything. We need to expand it a bit. I was briefly explaining events in the script chapter and now it’s time to use them. Change the script so it will read:
#include "scripts\base.inc"
on "LeftClick"
{
	actor.Talk("I've clicked on the door");
}
Save the script, run the game and click left mouse button on the door. Voila! We’ve defined our first interaction with the game world. We’ll expand more on that but before I’ll offer you a set of most useful events which are available from the WME side.
on "LeftClick" – Left mouse button was clicked over the node.
on "RightClick" – Right mouse button was clicked over the node.
on "MiddleClick" – Middle mouse button was clicked over the node.
on "LeftDoubleClick" – Left mouse button was double-clicked over the node.
on "RightDoubleClick" – Right mouse button was double-clicked over the node.
There are more events to use, but for the start we’ll be ok with these.
The scripts attached to the node have another interesting feature, they are parts of the object so you can access their properties by the identifier this. Let’s experiment with this concept a bit. Change the actor.Talk to read:
actor.Talk(this.Name);
If you save the script and run the game, upon clicking on the door actor says “Door”. Does it ring a bell? But of course, it’s a Name we’ve set in the scene edit. As you can see, what we set in the Scene Editor is easily accessible from the script which brings us to yet another actor method:
actor.GoToObject(Node); - Goes to coordinates specified in the Scene Editor under “Walk to” and then turns to the direction specified in the same place.
But we also know that the entity is represented by a keyword this. Can’t it be simpler than that? Try to rewrite your event handler to:
on "LeftClick"
{
	actor.GoToObject(this);
	actor.Talk(this.Name);
}
Provided you’ve set correctly the coordinates in the scene editor, actor should go to the door and says the word “Door”.
Last experiment with our infamous door for now is setting their Active property to false and thus disabling the door hotspot after we click it.
on "LeftClick"
{
	actor.GoToObject(this);
	actor.Talk(this.Name);
	this.Active = false;
}
As we see we’ve scratched surface of two objects so far. Actor object and Region Entity object, which we referenced by keyword this and hid it through setting its attribute Active to false.
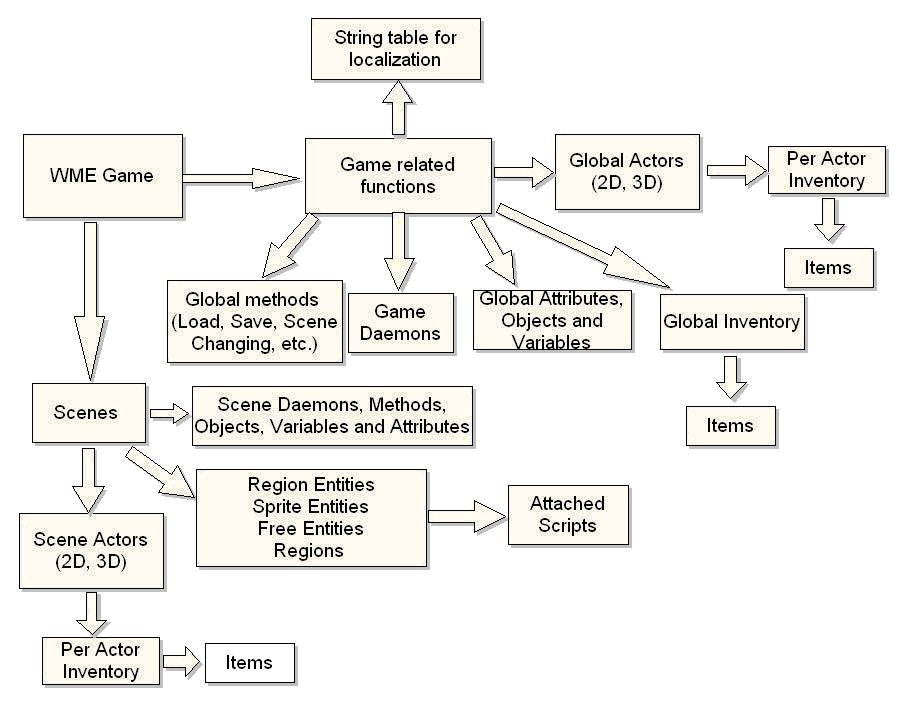
Let me return back to the image we’ve seen at the beginning and look at this very image from a developers point of view.
Now it won’t probably surprise you that the main game object is called Game. You can also see that everything in this diagram is derived from the Game object. If we look at our door entity from this point of view to see where it’s hidden, we’d go this way:
Game → Scene → Door.
We know, that we can reference Scene as Scene, but don’t let this fool you. The scene is in demo actually defined in the game.script which is the master brain of the game as follows:
Scene = Game.Scene;


