1.2. Sprite Editor
Let’s start with a question – what are sprites and why would I need such things? Sprite is one or more images which are coupled together with additional informations which your typical image never contains. WME doesn’t support animated image formats as gifs, flc’s or others; it uses its internal sophisticated format for storing animations and other additional informations. Such files are called sprites.
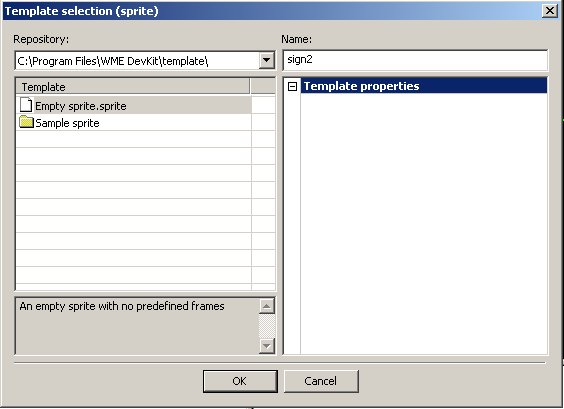
Navigate in the Project Manager to the folder data→scenes→street→sprites. Right Click the folder and choose Add Sprite. The following window appears:
We’ll leave the left half of the window for the template discussion in later chapters and just fill in the new name of the sprite. We’ll name it sign2 because we’ll try to create the sprite we already have there. The purpose is to understand the process of the sprite creation with the ability to compare our tests with the already done file.
Click OK and then double click the newly created file in the Project manager to enter the Sprite Editor.
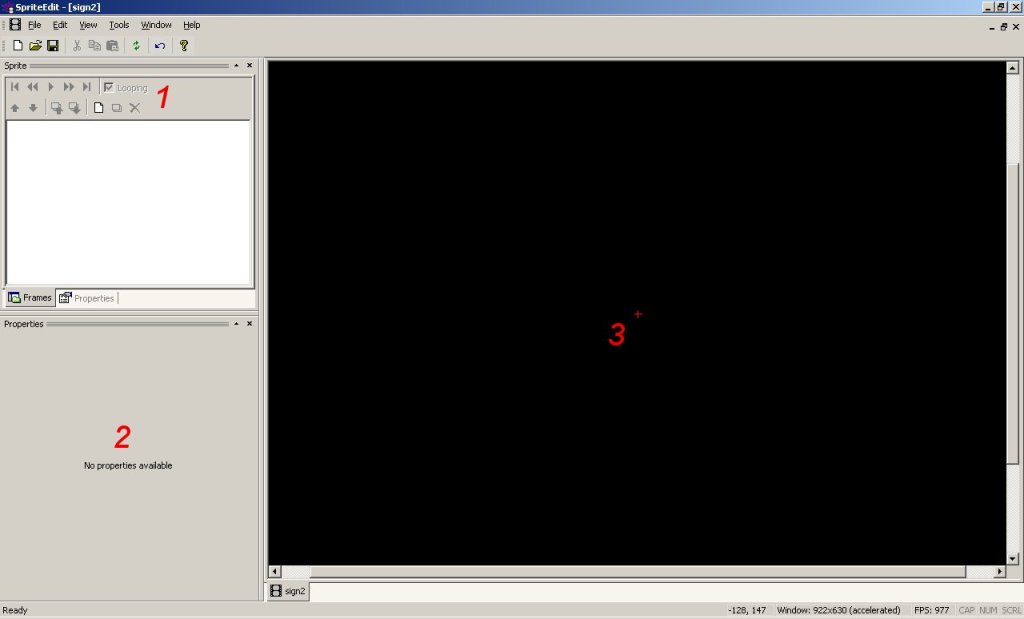
Let’s follow our way of introducing the tools and start with the section 1.
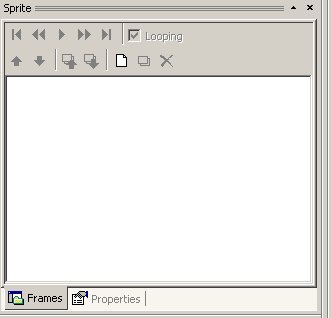
Every sprite consists of one or more images which are called frames. By changing frames at time, illusion of the fluent motion appears. Speed how fast are the frames played is called framerate and it's defined in frames per second (24fps means that in one second 24 frames get played and it's the framerate of the most commercial movies). WME doesn't constrain you to such framerate. Instead you can choose how long each individual frame stays on the screen which gives you neat possibilities. As a sidenote, sprite format also knows so called subframe, but we’ll get to this later.
Since our sprite is so far empty, you can see that we have no icons enabled except the “new frame” icon. Let’s click it and navigate to the folder “data→scenes→street→sprites→sign” and choose a file sign00.bmp. I'd like to make a side note to supported formats. I actually ended up using only two graphic file formats – png and jpg. Png supports transparency and it’s well compressed without losing quality. I use it for all sprites and overlays. Jpg is much smaller in size, but it has a toll in loosing the quality. I use it for backgrounds. Now there are some rigid graphic artists who won’t allow any compressions to their images. They can stick to png files but the toll is that their game will be much larger. So always make a decision somewhere in the reasonable middle. Is my game going to be an art gallery on 2 DVD’s or do I want to make a downloadable game? There are many options in the middle. Just use what suits you the best. The only format I avoid is bmp as it doesn’t bring anything new and it’s much larger then png + it doesn’t contain alpha channel and the ancient way of color masking is certainly obsolete.
But let’s get back to our sprite. We can see that there appeared in section 2 quite some properties.
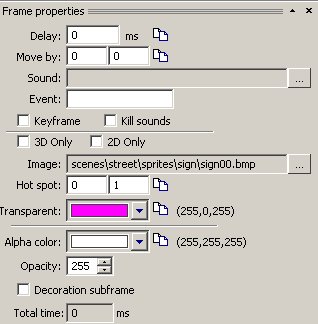
Let’s focus on one common button which you can find for example next to the parameter delay. This will be very often used because it copies the value you set in the field for all frames. So if you want to have an animation of 10 frames where the changes from frame to frame occur each 60 milliseconds, you simply fill in Delay 60 and click on the copy button next to the field. But I’ve already uncovered the first field so let’s recap.
Delay is the time (in ms) how long the frame will stay on screen before proceeding on the next frame.
Move by is the amount of pixels by which the sprite frame moves on the screen. I prefer doing screen movement in scripts as it is much more flexible, but the option is here. First value is X coordinate and the second value is Y coordinate (X is horizontal, Y is vertical).
Sound is the audio file which will be played when this frame appears.
Event is a very nice feature. Even the single frame in the sprite can throw so called event which means that it notifies the script that the frame just appeared. You can use this for some neat synchronization and we’ll be playing with this later when we start with some real creating. You put there some identifier (name of the event).
Keyframe is at the time being not used.
Kill sounds means that this frame stops all previous sounds played by the sprite.
3D only / 2D only - specifies whether this frame should only be displayed when the game runs in accelerated mode or non-accelerated mode respectively. This way you can optimize your sprites for both the accelerated and non-accelerated mode if you need to. For example you can add a shadow subframe, which will be half-transparent. But it would look bad in non-accelerated mode. Therefore by checking the "3D Only" check-box you can disable the shadows for non-accelerated mode. (taken from the WME help file)
Image - the image to be displayed in this frame.
Hot spot – is very important spot in the image. It’s the active part of the image used for a couple of purposes – if you use a sprite as a mouse cursor, it is the real spot which points to the screen (yes, it really is a single point not the whole rectangle) and it’s vital for overlays, which we’ll get to in the scene edit chapter. By default (and without sprites) every image has its hotspot at its position 0,0 (first pixel). But sometimes this behavior needs to be overridden. For example imagine a cross hair cursor. You’d want to have the active spot of such a cursor in the middle of the crosshairs. Now if you look in the section 3, you see a little red cross. It’s the hotspot. If you drag the image around with left mouse button around you can see how the hotspot changes. Try to put the sprite’s hotspot in the center of the sign image. You can also use numbers if you know where to put it. And again you see, that the copy to all frames will prove extremely useful for the hotspot positioning.
Transparent – is nowadays an obsolete function which handles the non transparent images. Back in the days, when people didn’t know how to use forks or spoons, someone decided to display a transparent image by the following scheme. He took one color from the color palette and decided that instead of drawing this color nothing will be drawn – which results in transparent pixels. This way you “may” make transparent images, but trust me, it’s the hard way. In case you’re still interested, simply make an image with ugly pink color (RGB: 255,0,255) and you’ll see that the image will get transparent. But if you use for example antialiasing on that image, you’ll soon discover that using transparent color is a road to hell. So remember to use png files which have separate alpha channel where you can comfortably define transparency and WME will handle these just well without additional fooling around.
Alpha color / Opacity - specifies the color shade and opacity of the current frame. You basically use this option mostly for setting transparency level of the frame.
Decoration subframe - A frame marked as "decoration" will be non interactive even if the rest of the sprite is interactive which can be useful time from time.
Total time – is a read only value which displays how long the sprite will be played.
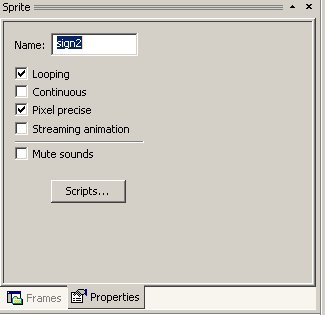
Now before we add another frame to our sprite, let’s try to switch to second tab of the section 1 which is called Properties.
As you can see, apart from sprite’s name you can set a couple of parameters:
Looping means that upon reaching the end the sprite starts over.
Continuous is not used yet.
Pixel precise is very important value. If you have an image with transparent parts and pixel precise is on, the image is interactive only on its nontransparent parts. If you set this off, the whole rectangle will become interactive.
Streaming animation needs again a bit of explaining. If you want to make a large sprites (in terms of many big frames) you can trigger unwanted behavior. As the sprite is typically loaded when you enter the scene, you have to wait until the whole sprite is loaded. So sometimes you wait and wait, Streaming animation tries to solve it with a way of reading the frames when the sprite is displayed and caching them into memory with the first play through. But it’s slow. There is a better way how to approach large long animations through a video entities but we’ll get to that later. For now just note this option and let it off.
Mute sounds option just turns off the sound of this sprite.
Scripts button is for low level control of the frame. Rarely used too.
So now, when we understand what’s what, let’s add some more options to our sprite.
Click on the new frame again and select the other frame. Note that you can also select more frames at once if you want to import larger amount of frames. Select the file sign01.bmp and import it.
Now you can see that you can also move the frames around using the green arrows in section 1.
If you look at the first row of the section 1, you can see the play controls. They’re here for your sprite testing. So let’s press play now. Whoa, that’s fast! Let’s make it more fun. Select first frame and type in the delay 1200. Select the second frame and type there 1000. Now press play again and you see that your sprite starts to look better. Save your progress (remember the ctrl+s is saving?)
And again we try some more stuff. With the bottom frame selected, click on the browse button next to the sound and select sound “neon” from “data→sounds” folder. Now test your sprite to see how neat is to have sound playing on the specified frame.
Note: If you want to remove filenames there’s a procedure common to all tools. Click on the browse button […] next to the field and select cancel. WME asks you if you want to remove that file and upon confirmation it’s removed.
Another maybe useful thing in the sprite definition is so called subframe. Subframe means that one frame is composed from more images. I personally never used them but maybe some of you are more creative. Subframe is created by clicking on the frame and then on the icon to the left of the red X. You can order your subframes around too using the remaining two icons.
Speaking of which the red X doesn’t mark the spot, it deletes the frame / subframe so be careful.
Last thing in the sprite edit is the ability to test the sprite with the real background. For this test (it won’t appear in the sprite though) you can use the menu function “View → Background image” where you can specify the image, its position and opacity. If you’re tired of that image, simply click on the No image button. I believe that you can now safely save your sprite and close the sprite edit because you probably know now more about sprites than you ever wanted to know.
Let’s move to the most used tool called Scene Edit. Here you spend a lot of time when designing your game and thus I’ll try to explain this building block as much as possible.

